Archetypes and Artist Identity

Above: Photo of Suzanne Wright Crain's altar in progress.

Deep work and deep play took all of us into wonderful work this past weekend. Here are some photos of artists at work -- some made altered books, some altars. Everyone, including me, found some insights pertinant to our particular time, space and needs.


Robin Early and Suzanne Wright Crain and Martha Grant work on their Archetype projects.

As we looked at various approaches to exploring our "inner teams," I had found some work by creativity coach and author Eric Maisel that shed light on the ways identity as an artist (or should I say identities) can both help and complicate our work, identity and paths. Am I artist the beautifier, artist the visionary, artist the businesswomen, artist the  producer, artist the activist...??

Recently an infographic came across my path that also informed this pondering:

http://www.swiss-miss.com/2011/12/how-photographers-actually-spend-their-time.html

Certainly teaching a workshop such as this Archetype workshop calls on my skills as teacher and mentor, while I also try to do my own work ast least part of the time as a way of modeling and demonstrating the processes and products involved.

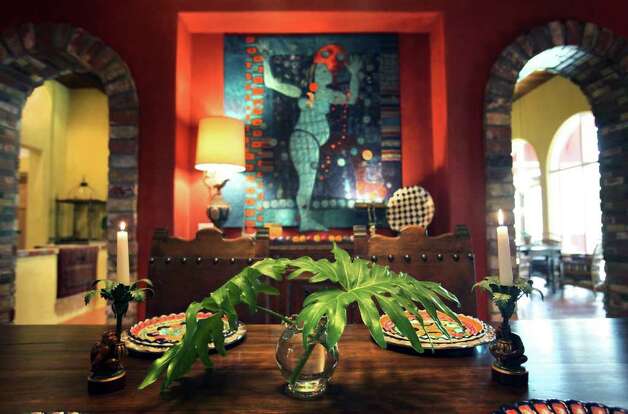
Then, as the weekend came to a close, a friend called and told me one of my large textile pieces was included in a "home" section report in the San Antonio Express News. I called the collector and thanked him (and his wife Suzi) for giving the reporter my name (read the story for more info!). Ah, another artist identity -- published and out there. 

The dining room in the home of Suzi and Dennis Strauch, near Pipe Creek, has a quilted piece of fabric art on one wall. Photo: BOB OWEN, San Antonio Express-News / © 2012 San Antonio Express-News

The dining room in the home of Suzi and Dennis Strauch, near Pipe Creek, has a quilted piece of fabric art on one wall.

Photo: BOB OWEN, San Antonio Express-News / © 2012 San Antonio Express-News

Read more: http://www.mysanantonio.com/real_estate/article/Spaces-A-global-chic-Pipe-Creek-home-with-more-3431078.php#ixzz1qLiJe3Zi

Developing an Idea for Textile Art


Thanks to my friend artist Rosa Vera, who sent me these shots after a recent workshop at El Cielo, I have a nice documentation of some design work "in progress." 

This workshop -- designed and executed for a group of four working artists who get together for occassional studio time -- was focused on developing an image through different tools and media, with drawing, cut paper, collage, etc. It was play time with a purpose. 

I was working alongside the group, demonstrating, but also taking my own image of a dried up cactus pad (dessicated after the hard winter freeze) though the process. The final result was a small art quilt -- you'll see that at in the final picture. The only thing I don't have is an image of the original cactus pad -- I'll try to find it and post it later. Thanks Rosa, for the photos.

Above is the final piece, still in progress. I made the thermofax from one of the pen and ink drawings, drew on the cut out shapes for the applique pieces and played with a color palette from some previously monoprinted fabrics. Will try to find the original and the final soon!


Text on the Surface at SWSchool

Coming this spring to a school in SA:

 Intermediate/Advanced

2560 | Text on the Surface

Susie Monday

Learn to embed text messages into the surface of your art cloth or art quilts, with the form holding as much importance (and as much of the “message”) as any literary element. The words might disappear, remain legible, or become a surface texture; find ways to add letters and text with innovative materials. Some techniques to be explored include soy wax scrafitto, stitched paper cloth with word collages, direct printing on fabric with an inkjet printer, sun printing with letters and words using dye and paint, and making your own stamps and thermofaxes with words, collages and favorite quotations. The course includes handouts and other resources. A supply list will be posted on the SSA website.

Mon, Jan 31 – Feb 28 | 1:00 – 4:00P

Surface Design Studio | Navarro Campus

Tuition: $170 (Members: $155) | 5 weeks

Need a Jump Start? Or a Kick to Closure?

El Cielo Studio is waiting for you!

It's time for another edition of the El Cielo Studio UFO workshop. December 4-5 (yYep, I know it's December). If you have a piece of work or two that has been haunting you over the past months, weeks or year, bring it to this workshop retreat for a little energy to completion -- with the expert advice of some sister/fellow artists. Often, its just focused time and a new eye that helps a piece find completion and success -- or we might all just decide to cut, slash and start again!

Sometimes it just takes focus, and that's what this UFO (Unfinished Fiber Object) retreat is meant to provide. We'll start with a round robin of look-and-see-and-suggest (totally controlled by you, the artist) and then work during the next two days with all the resources of the studio available. For example, you'll be able to design and make thermofax screens, overdye or over-print, add some stitching with the machines or by hand, get help with frames or finishing details, even a little writing time to write and edit an artist statement if you wish. Learn a technique with a individual session with Susie, or practice something new with aid and abettment by the experts on hand.

In between individual work sessions, I'll lead some creativity exercises aimed and energizing the process, and we will, of course, enjoy great food, good company and each other's tales of success and strategies for living the artists' life. (P.S. I've had a request for "on-line" remote participation for a similar workshop -- I'm working on that for next year!)

One possibility, if time allows and the group wishes, is a Sunday afternoon outing to see a private family museum in-process, with some amazing collections of folk art, drawings and paintings and more. And, the hot tub is back in action, the hills are alive with color and breeze and hawks flying through on their winter migrations. Bring your binoculars and  walking shoes if you'd like a little hike down the hillside, too.

Here are the next few workshops that are coming up:

UFO WORKSHOP December 3-5 UFO, “unfinished fiber object.” Bring along work that needs finishing (perhaps a gift or two, or work that’s stuck for need of constructive critique). Enjoy the resources of the studio and the advice and support of peers. We’ll customize the techniques to the tasks at hand.

ARTIST'S JOURNEY/ ARTIST'S JOURNAL, January 14-16 This workshop has become an annual tradition. Join me for a weekend of reflection, goal setting, and information about how the habit or journaling can benefit you as an artist -- and make a unique journal cover and artist calendar for a new year of creative work and inspiration. Building good habits for your own work. (SPACE IS ALMOST FILLED FOR THIS ONE)

(HEART) YOUR INNER ARTIST February 11-13

How do you nurture your creative self in a world that doesn’t always honor artists and artful work? This pre-Valentine’s Day workshop will provide that sup- port while you learn more about your individual design strengths with creativity exercises, learn simple yoga and breath work, and make an artist’s altar for your studio. 

El Cielo Studio workshops are designed with the needs of the participants in mind; free time is sched- uled throughout the week- end for reading, reflection and personal work in the studio. You are welcome to bring projects in process for Susie’s critique and for peer feedback in an environment of trust and respect. You’ll share meals, poetry and stories, music and advice for living an artist’s life. Enjoy the 25-mile vistas from the deck and strolls down the country roads. A spa and pool, and large screen media room are also avail- able to participants. The fee for each workshop retreat is $175 for a 2-day event with discount for early enrollment. Comfortable accommodations (double and single rooms with private and shared baths) and meals are available from $15 - $30 per workshop. Most supplies included. Call 210-643-2128 or email susiemonday@gmail.com


And on to the City

I arrived in Houston last night to present two lectures and a one-day workshop for the Houston Fiber Artists, HAFA. Great reception and hospitality so far, and I'm off to the second lecture in a few minutes. The Friday workshop has given me the opportunity to jump back into my planning for my online course test -- yes, it really is coming. On Friday I'll do the "live" version of Words on the Surface, and next week I'll launch the on-line version. So if you missed the Houston workshop, stay tuned for sign-up info about the course coming soon. My test pilot group will receive first dibs on enrollment, since I'll keep it at 15 max for this first venture online.

If you haven't added yourself to my test pilot group, please send me a note through the sidebar email form or just directly. I'll put you in the notification group. Words on the Surface will include creativity exercises and writing, collage, mixed media printing, stamp-making and fabric stamping, sun printing,  ink jet printing and maybe a couple of other techniques -- in a 6 lesson format with one lesson a week. I hope to include video and slide shows, and a lot of links to online resources and examples.

P.S. The completion of the Youth Ambassadors program at Selah and then at Say Si was a great success. The kids are now at Tapatio Springs, for their final wrapup with Georgetown University staff and their mentors, in liu of traveling back to Washingon, DC. An impossible journey given the snow!

J. David Bamberger speaks to the Youth Ambassadors group about his amazing journey to restore habitat in the Texas Hill Country, entreating them to do the same in their own countries -- both for the land's sake and for the economic potential in such activity.


Back in (pre) History

Pat Schulz' photo of some of her circular "prehistory" inspirations

Prehistory, petroglyphs, pottery. All these earthy inspirations did just that --took a small and dedicated group of artist investigators into the past, with a process. This past weekend was the first of what I am calling a series of Make a Study workshops, each with the focus on a different period of art history as the "content" for learning a particular process of creative investigation, ie "making a study." The process takes participants through a procedure that marries content, form and individual interests and individuality strenghts.

Here's what we did (edited from the workshop handouts). I'll probably offer this one again sometime this year, as there was a lot of interest, but the date just didn't work for some and a couple of other participants dropped out due to illness. Pat and Cindy made the weekend a treat for me, and since the group was so small, I had more time to work alongside.

Making a Study -- a creative process for artists and others

Whether one’s chosen topic or theme for a piece of work is assigned, chosen or commissioned, this process of “making a study” can yield satisfying, original and interesting work that reflects one’s personal style as an artist/creator. And the process pretty much stays the same whether the end product desired is a fiber art work, a traditional quilt, a painting, a poem, a play, a novel, perhaps even an innovative business! This set of procedures is open-ended and improvisational, but has a logical, linear set of “rules” that order the investigation/study. Each artist, sooner or later, develops her own way of making a study, and adapts these rules to her needs and desires, but the workshop this weekend will take us along one path though the study.

This workshop takes on a vast  “period” of creative endeavor -- that of humankind’s prehistoric, or pre -“civilization” expressions -- as rock paintings and carvings, “primitive”  clothing, textiles and pottery, in documentation and speculation of humans as creators in our most “native” state of culture. This is a huge area of inspiration for artists throughout the ages, and it remains a deep pool of connection to us as beings in nature, with nature and with our most simple tools and materials. It is the first of a series of workshops here at El Cielo where participants will engage their imaginations, hands and hearts with periods of art history (in this case pre-history, too).

Here's my inspiration table set up in the studio before the workshop. I like to think of the studio as a "theater for ideas," and try to design a stage set that sets the mood with all the Sensory Alphabet taken in to consideration.


NEW: A CREATIVE STUDY:  PETROGLYPHS, POTTERY & PREHISTORY
NOVEMBER 6-8 (optional Friday night potluck and critique session)
Many artists have found inspiration in prehistoric and archetypal imagery from caves, cliffs and ancient ceramics. This is the first of a series of “creative study” workshops that will illuminate how you as an artist can take inspiration from the images and imagination of the past, while transforming the images into something uniquely your own. This workshop models a time-proven creative study process (based on that developed at Learning About Learning Educational Foundation and the Paul Baker Theatre)  that can be adapted to many inspirational sources. We’ll go from collection through synthesis to creating, and explore textile and mixed media techniques that relate to the aesthetic and philosophical qualities and intent of the earliest art-makers. Explore some simple natural dyes; use handmade brushes as tools, make pigmented paints with ashes, earth, rust and minerals.

9:00 - 12 noon  COLLECTING IDEAS
All of the activities for the morning are designed to take you through a variety of ways to collect ideas for later use in projects. You will collect far more ideas than you can use this weekend -- perhaps more than you can use ever! Don’t make judgements about your collections during this morning work. You will edit, refine and combine elements from your collections later. Try to keep your inner censor at bay when drawing, moving, thinking, writing, collaging. This is process, not product.
My collection wall of spiral ideas and images.
9- 10 Collecting from books, magazines and photos.
Go though any books, photos, magazines, etc that you see in the room, that you brought, even on the computer, if you want to google! Make copies on the copier of photos or illustrations that you find interesting or surprising or otherwise engaging that relate to our theme of prehistoric symbols, art, culture or creations. You can also make sketches of elements that you find and like  in the photos or books.Trust your instincts. Don’t try to make sense or order from what you are collecting. However, you are welcome to narrow your focus if that makes you more comfortable with the scope of our work. For example, you may just want to work with rock art images and symbols,  or totems and animal images, or you may want to focus on Meso-America or Native American images and culture, rather than the whole world of prehistory. If there is a particular aspect of this big topic that is particularly interesting to you, go with it -- but

10-10:15 Collecting with words
Spread out your collection of images. Write lists of words and phrases that come to you as you look at them. Think Sensory Alphabet; LINE, SHAPE, COLOR, TEXTURE, LIGHT, SPACE, RHYTHM, SOUND, COLOR. Be as specific and descriptive as you can. Again, don’t worry about making connections or making sense, go with the flow. Work quickly, easily.

10:15 to 11 Collecting objects and sketching
Look at the manmade and natural objects in the room. Thinking about the words you wrote, and the pictures you collect, select 10 or so objects that seem to have some kind of relationship to the other things you have collected (It doesn’t have to be a linear, logical connection!) SKETCH those objects. You do not have to make the sketches “realistic”, just capture the important lines, shapes, textures, rhythms, etc! Keep the 5 objects you find most interesting after doing the sketches. You may also want to take photos of these objects.


11 -- 11:30 Collecting outdoors
Take a walk around the property (watch for loose rocks, snakes, etc!) and take photos or make sketches of details, scenes, shapes, shadows, textures, colors, etc (the whole Sensory Alphabet again) that you think have a relationship to the theme we are exploring. Collect physical items that you might want to use. (Lots of bags and boxes are available). Take time to just sit in nature and imagine what it would have been like here as a human with out all our creature comforts and material goods.  Write words and phrases that come to you. Be attentive.

11:30 -- 12:00 (more-or-less) Arrange your collection in the studio, garage, porch or outdoors in a place that pleases you. There are lots of card tables in the garage to use if you wish. Make this like a mini-museum of your collection to share with the others. As you arrange things, you may see relationships. patterns, similarities or distinctions that are interesting. You can highlight these in your arrangements.

1:00 -- 4:00 PLAYING with IDEAS
The next stage of this process of making a study is to play with some/all of the ideas that you have collected. You can use everything or just a few narrowed down selections, but again, the idea is to approach your work with fun, ease and fluency, not judgement, perfectionism or a “race to the finish” mentality. You may go down a lot of “dead ends,” but something may come of one of these paths later in your creative work. The idea of this stage is to take one or more of the inklings into different media, materials, genres, and to look at how one or more of these ideas morph, combine, connect, etc. (PS this is where we sneaked in the rusting fabric, tinting with natural materials, experimenting with some different tools, etc).

1:00 - 1:30 Asking Questions
Choose  a few items, photos, sketches, phrases etc from your collection that are interesting to you. Make a list of as many questions as you possibly can think of in the time alloted about those items. (for example: Who made this design first? What was this early artist imaging when she/he drew this? What tools were used for this?...etc.)Just keep writing until time is called. Make up silly questions if that is all you can think of! You dont have to know th eanswers or even expect to find out the answers. The process of open-ended questioning can inspire amazing directions for creative work.

1:30 -- 2:30 Simplifying, Multiplying, Playing with Scale
Take as many images as you wish through these processes: (Susie will demo all first)
Cut black paper shapes inspired by the idea you collected. Paste it on white paper, Try the opposite -- white on black. Simplify with cutting  paper, and then try simplifying with a sketch or drawing. Which works best for you? Try using tracing paper to trace an image and simplify it. You can also use the computer if time allows, using photoshop and “stamp” filter.
 Reduce and/or enlarge a visual idea, symbol or sketch (you might need to simplify it first). How does the idea change? Use the copy machines or do so manually.
Collage multiples of an idea image. Use the copy machine, make a simple rubber stamp, eraser stamp or or foamy stamp. Use paper or fabric for your stamping multiples.
Cindy's dancing girl petroglyph stamp.


Pat's "modern petroglyphs" inspired by some of her image experiments.

2:30 - 4:00 Explore New Media: Photo Transfers with Polyester Plastic sheets and Polymer Medium.
Options: you can use a photo you took (or take now), a picture from a book or magazine, a sketch, a collage you make from multiple images that you have collected, A tracing of an illustration, etc. This can be a color or black and white or sepia image.

The Basics. 
You need polyester transparency sheets, available from art stores or online. These are designed for wet media and to be non-beading. Use a strip of painters or masking tape on the leading edge.
Experiment with different printer settings -- each gives different results.
Run the polyester sheet through the printer with your image or a computer sourced image. The image will be wet when it comes out of the machine
Turn the image face down on your fabric. (For permanence, fabric will need to be treated with bubble jet set or you will need to use the polymer medium with the image. Use your hand or a brayer to transfer the image to the cloth.
OPTIONS; Dampen the fabric first, with  foam brush or with a sprayer
Brush with polymer medium -- thick or thin -- first (this will need to be washed off the transparency sheet quickly) or after the image is transfered.
Brush with water to melt the image. Spray with water, mist or sprinkle
Overprint with screened image or stamps.


A polyester film transfer of some of my spiral image playtime.

SUNDAY 

9:00 -- 10:30 MORE Explore New Media: Screen printing with charcoal, spice powders, dyes watersoluble media. (We didn't get to all of this, just used charcoal and water soluble crayons) Demo by Susie, then work time with whichever media and images you wish to work with. Details about this process are in a previous post and will also appear in this next month's Quilting Arts magazine.


10:30 -- 4
INVENTING WITH IDEAS
Now’s the time to take all/some/a few/even just one of the ideas that you collected and played with and take it to a form. Since we’ve started with prehistory, I suggest that you work in a form that has some relationship to the period: doll, totem, petroglyph imagery, a cave wall in fabric, costume or mask.

Obviously, this post is overkill with the detail, but I confess to having a lot in my sights today -- I am both trying for some R&R from the weekend (though I admit it was so much fun I don't really need down time!), and trying to think a bit about the end of year, and next year's goals. The holiday season gets so busy, I have a hard time getting in enough reflection time in December. I also seem to be somewhat in a tiny lull after so much work getting it together (and apart) from the quilt festival.

One of the shortcomings I see in my process of work is a certain lack of  "sticktoitiveness." So I am setting some things in motion that will give me some repeatable touchstones for work -- a quilt challenge with 12 others that lasts two years (good grief). And if I'm not too late to join up, setting one major annual goal for Oct - Oct 2010 (ok starting a month late) with the SAQA Visioning process. I hope to hear if I'm in on that one by the end of the day. If I don't get into the formal process, I will try to do it on my own.

And, along with those, getting myself back to the blog on a really regular basis. Yes, you have heard this before from me (and how many countless others whose blogs sit withering on the vine), but this time I MEAN IT.  And those two other commitments will I hope keep me honest and give me a lot of new ideas and processes, successes and challenges to include on these virtual pages.

P.S. The next process oriented workshop is the first weekend of December. Here are the details!

NEW:
MEMOIR, MEMORY and MEMORIAL
DEC. 4-6
(optional Friday night potluck and critique session) Continue the season of Dias de los Muertos by creating a memorial altar to a person, to a personally potent memory (or past life of your own), even to a summer vacation! Learn to transfer photos onto a number of interesting surfaces including plastic, metal and fiber; add words, names and text with resist crayons; microwave dye custom fabrics, and embellish your textile and mixed media altar with all manner of beads, trinkets and meaning-full treasures. $150, (Additional $10 fee for wooden altar frame.)

Email me directly or through the form on the sidebar if you are interested. I'll send details about the rooms still available (free to $30) and other details.

The Shape of the Matter

I've been playing around with notan expanded squares for years, ever since Jane Dunnewold of Art Cloth Studios showed our class the Japanese exercise. Her explaination is on the tutorial section of the Art Cloth Studios website, so you can go there and get the instructions straight from my source.

As Jane writes, so eloquently (as she always does),

Both symmetrical (the same all around) and asymmetrical (different on each side) designs can be achieved through the use of the expanded square concept. In order for the exercise to be completed successfully, there must be a feeling of balance in the design created. A symmetrical design can still be heavy, ponderous, or boring. If the design is working, it will be interesting and will feel balanced on all four sides. Test this idea by turning your paper as you study a completed design. Does it measure up when rotated and studied? Is it interesting from all directions?


There are many other notan exercises, all of them derived from what is considered a kind of visual meditation sometimes by its practitioners.This example is even simpler in execution. Simply cut a square apart in any way you wish, with the object being to reassemble it with white space in between, making again a pleasing and intriguing balance of white and black, light and dark.

I also like to play with the shapes in multiples, enlarging and reducing them on the copier, then reassembling into a rhythmic shape composition.

These exercises are a neverending source of inspiration for stamps, whole cloth quilts, applique, stencils, screen-printing and other graphic applications to fiber arts. I'd love to see your examples! Like snowflakes, there never seem to be two alike! Here's another site with examples too, from Princeton Online.

And here's a wonderful extension of the discipline into maskmaking by a class at San Jose.

By the way, there is room for one more shape-minded person in June's The Shape of the Matter workshop at El Cielo Studio. We'll be doing notan and lot's of other shape exercises in design, using shape as the structural bones for an art quilt, and more. If you're interested, send me a message via the contact box on the sidebar. Dates are June 26 - 28. For further info, see the workshop page.

And, if you're not overwhelmed with opportunities yet, you can find more shape exercises in our new book -- yes, it's for parents, but each set of activities includes a page for the grownup investigators, too.
Here's the exercises in the Shape section -- plus a whole slew of others that didn't make it into the book. I'd love to hear your ideas, too.

Shape investigations to do on your own:

Explore your home as though it were a museum. What kinds of shapes have you collected, consciously or unconsciously? Make an arrangement of disparate objects that share a shapely characteristic on a bookshelf or windowsill. What would the catalog of these shapes say about you?

As you drive through your neighborhood notice the shapes of buildings, homes, stores and other structures. Do the shapes that you see serve as clues to architectural eras, the history of the street? If yours is a new neighborhood, what historical styles have the builders called upon for inspiration? Shapes of windows, doors, rooflines and facades are your best clues.

Cut or tear shapes from colored paper and collage them to solid colored cards for interesting personal note paper.

Enroll in a ceramics class at a local art center or continuing education department of a local college or university. Or for self-guided exploration buy a 50-pound box of ceramic sculpture clay from a local supplier.

Watch a dance or mime performance (live or recorded) with an eye for shape, how the performers use their bodies and each other to create shapes in space. Some troupes and artists to look for: Mummenschanz (on the web at www.mummenschanz.com), Martha Graham -- who else?


Take a walk along a creek bed or river and visually collect the shapes you see in stones and water.

Dip into Georges Perec’s 1978 Life A User’s Manual, a non-linear novel that uses writing constraints – rules that the writer has imposed on the content and structure of the book – much in the way a visual artist uses shape in the composition of a painting.

Write a haiku each morning for a week about the weather outside your window. (How do constraints of syllable count shape your thoughts?)

Think about how your clothing affects your silhouette as you dress for work or play. Make an effort to wear something that changes your shape and pay attention to its effect.

Collect a specific shape (circles or cones, for example) or specifically shaped objects (manholes, terracotta vases, interesting doors) by photographing throughout a day, a week, a month. Post your collection on a photography website, such as Flickr, to share it with others.

Carve simple shapes using a craft knife into the side of an art gum or white artist’s eraser. Make shape patterns and grids using black stamp pad ink on white paper. Enlarge and reduce and repeat shape patterns using a copier. Can these inspire a quilt or other art project?


Seasonal Palette

There is a hint of fall in the air, even here in deep South Texas. We opened the windows last night and slept with a cool northwest breeze -- at least until the neighbor's dog cornered a raccoon or armadillo or whatever under his porch. Ah, the peaceful country life. Nevertheless, like a chef in a big city kitchen, i find my color sense turning to autumnal hues, longing for the leaf turning rusts and reds and golds that are at least a month away from the hillside!

So here's a little visual inspiration, no matter what colors your actual geography is gifting you with today. For me, it's a tiny little look into the future. 

Above: Beautiful rusted fabric -- a great way to get autumn hues --  by artist Adrian Highsmith. She used this fabric in a series of textile collages for a recent art exhibit in New Braunfels.


Pomegranates are among the early signs of autumn here. This photo has found its way into a couple of new textile pieces -- one will be part of the faculty donations at the Houston International Quilt Show -- and I just realized that I forgot to photograph it before shipping! But, the piece above, finished just today, uses a similar color scheme and another print from the photo above. Look for the companion piece in Houston.

(P.S. I hope the leaves will at least have a tiny bit of russet by the time of my next El Cielo workshop, October 17, 18, 19. The topic -- Altares: Dias de los Muertes. You'll choose the memory or experience to honor;  a person, place, former self, even the birth/life/death cycle of an idea, creating personal symbols and meaningful imagery. The techniques: constructing a art cloth altar with fusing, machine quilting, hand-stitching and embellishing of fabrics you've created with photo transfer, flour paste resist and hand-painting. If interested, email me at susiemonday@gmail.com.)

Above, Not yet, but coming. This photo was taken a couple of years ago, when our fall produced some lovely hues. That's not always the case, but these early cool fronts bode well for color on the hillsides.